title: Everything you need to know on Cloudflare’s new DNS 1.1.1.1 layout: post current: post cover: assets/images/posts/1111.png date: 2020-01-16 00:00:00 +0545 navigation: true categories: blog tags: tech class: post-template subclass: post author: editor permalink: /blog/behind-the-cloudflares-new-dns-1111/ summary: 1.1.1.1 is a fast and private way to browse the Internet. It is a public DNS resolver, but unlike most DNS resolvers, 1.1.1.1 is not selling user data to advertisers. The implementation of 1.1.1.1 makes it the fastest resolver out there. The addresses of 1.1.1.1 —
Originally posted on: 2018-12-13. Updated on: 2020-01-16.
1.1.1.1 is a fast and private way to browse the Internet. It is a public DNS resolver, but unlike most DNS resolvers, 1.1.1.1 is not selling user data to advertisers. The implementation of 1.1.1.1 makes it the fastest resolver out there. The addresses of 1.1.1.1 are:
1.1.1.1 / 1.0.0.1
2606:4700:4700::1111 / 2606:4700:4700::1001
The main reasons to switch to a third-party DNS resolver are security and performance. ISPs do not always use strong encryption on their DNS or support DNSSEC, which makes their DNS queries vulnerable to data breaches and exposes users to threats like man-in-the-middle attacks. In addition, ISPs often use DNS records to track their users’ activity and behavior. These resolvers don’t always have great speeds and when they get overloaded by heavy usage they become even more sluggish. If there is enough traffic on the network, an ISP’s recursor could stop answering requests altogether. In some cases attackers deliberately overload an ISP’s recursors, resulting in a denial-of-service.
These downsides and risks of ISP recursors can be mitigated with a secure recursive DNS service like 1.1.1.1. With security features like bleeding-edge encryption and the fastest resolution speeds, 1.1.1.1 provides a better overall user experience.
Some other recursive DNS services may claim that their services are secure because they support DNSSEC. While this is a good security practice, users of these services are ironically not protected from the DNS companies themselves. Many of these companies collect data from their DNS customers to use for commercial purposes. Alternatively, 1.1.1.1 does not mine any user data. Logs are kept for 24 hours for debugging purposes, then they are purged.
1.1.1.1 also offers some security features not available from many other public DNS services, such as query name minimization. Query name minimization diminishes privacy leakage by only sending minimal query names to authoritative DNS servers.
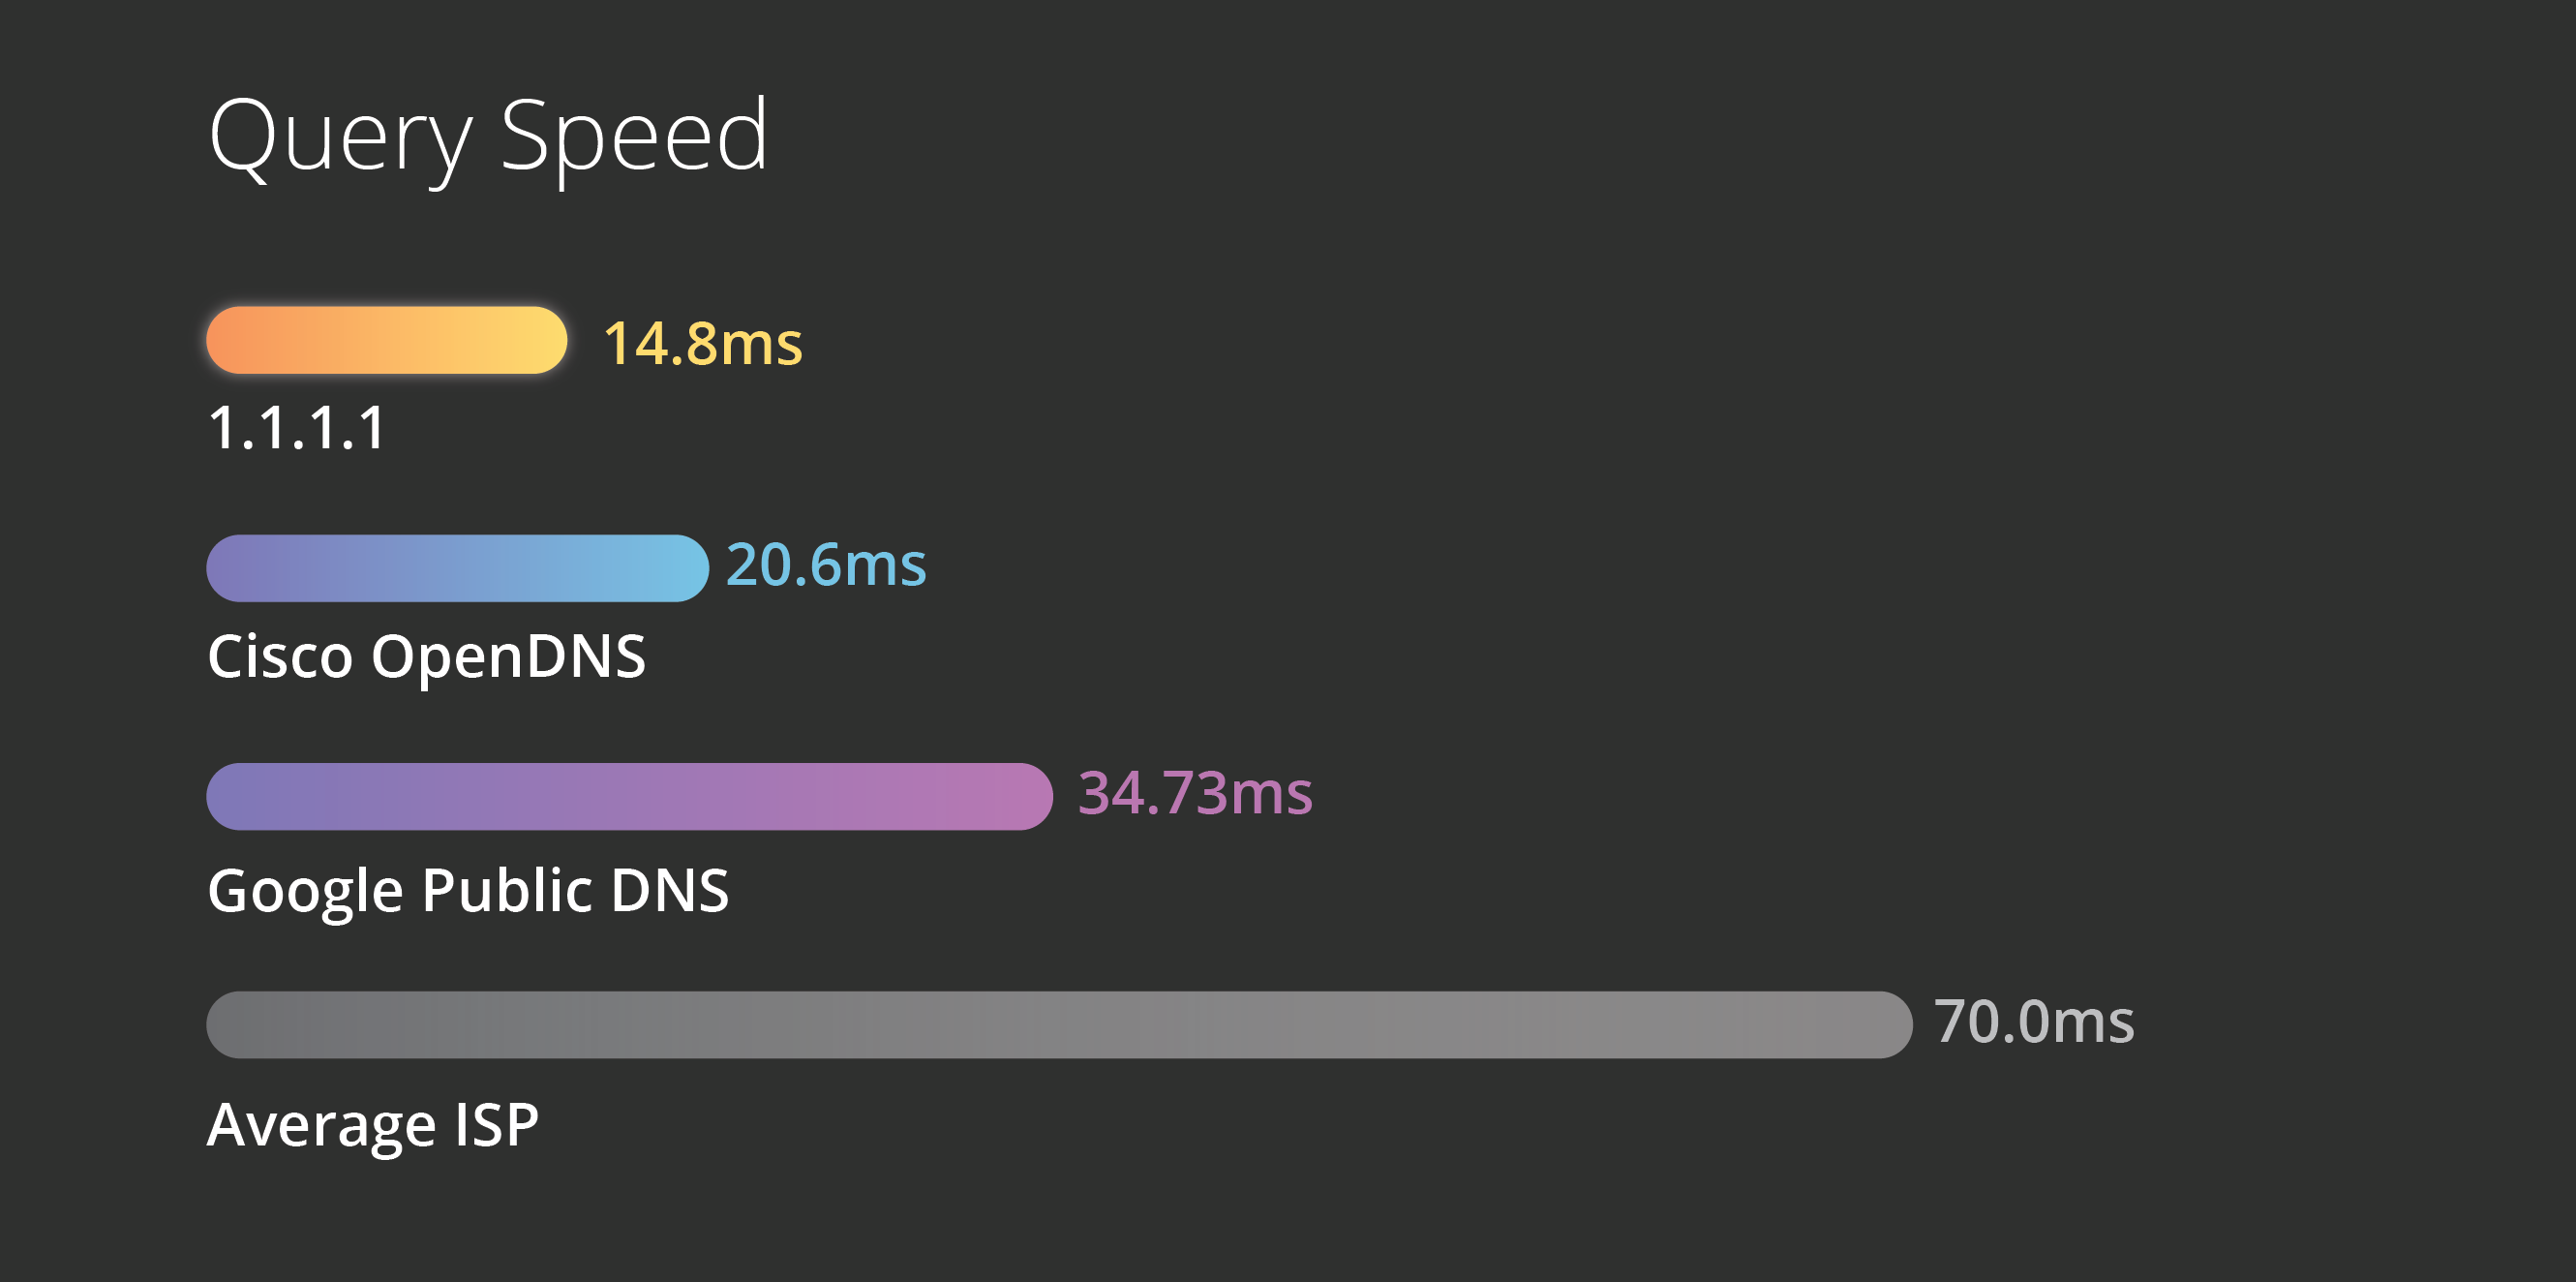
The power of the Cloudflare network gives 1.1.1.1 a natural advantage in terms of delivering speedy DNS queries. Since it has been deployed on Cloudflare’s 1000+ servers worldwide, users anywhere in the world will get a quick response from 1.1.1.1; in addition to this, these servers have access to the over 7 million domains on the Cloudflare platform, making queries for those domains lightning-fast.
The best part of 1.1.1.1 is that in addition to being the fastest and most consumer-centered DNS, it’s free to use. See how you can setup 1.1.1.1 in 5 minutes.
As per the developer instruction from Cloudflare 1.1.1.1 can be set up in different devices as follows:
Step 1: Open up Settings.
Step 2: Click on Wi-Fi.
Step 3: Press down and hold on the name of the network you are currently connected to.
Step 4: Click Modify Network.
Step 5: Click the check box called Show Advanced Options.
Step 6: Change the IP Settings to the option called Static.
Step 7: Remove any IP addresses that may be already listed and in their place add:
1.1.1.1 | 1.0.0.1 | 2606:4700:4700::1111 | 2606:4700:4700::1001
Step 8: Click Save. You may need to disconnect from the Wi-Fi and reconnect for the changes to take place.
Step 1: Click System > Preferences > Network Connections.
Step 2: Click on the Wireless tab, then choose the Wi-Fi network you are currently connected to.
Step 3: Click Edit then click IPv4.
Step 4: Change the DNS servers listed to:
1.1.1.1 | 1.0.0.1
Step 5: Click Apply
Step 6: Then go to IPv6.
Step 7: Add the DNS servers:
2606:4700:4700::1111 | 2606:4700:4700::1001
Step 8: Click Apply.
Step 1: Go to the IP address used to access your router’s admin console in your browser.
Step 2: Enter the router password.
Step 3: Find the place in the admin console where DNS settings are set.
Step 4: Replace the existing addresses with:
1.1.1.1 | 1.0.0.1 | 2606:4700:4700::1111 | 2606:4700:4700::1001
Step 5: Save and exit.
Visit 1.1.1.1 for setting up more devices.
This blog post was referenced from https://www.cloudflare.com/learning/dns/what-is-1.1.1.1/